
* Affiliate links are included in this post. All this means, is that if you click on one of those links and purchase something, I may receive a small commission. However, you will not pay a penny more- promise!
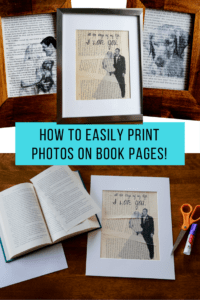
Are you a book lover? Or perhaps just love the classic look and simplicity of a crisp page within a novel? Then I have a project for you! This fun and easy craft is not only a perfect way to express your love for all things books, but also is a unique and classic way to decorate!
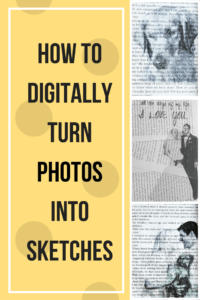
I LOVE pictures but wanted a fun twist on the classic matte or gloss finish that photographs provide when decorating our master bedroom. This was when I decided to take my favorite photos, turn them into sketches and print them on book pages!
(Disclaimer: This blog is a participate in the Amazon Services LLC Associates Program, some of the links you’ll find in this posting are affiliate links. If you purchase anything through these links, I will earn a commission. I aim to only recommend products I have used, trust and like, which is why I am recommending them to you!)
SELECTING THE BOOKS:
In order to make this project work you will need book pages that are heavy on text (no pictures) and that you are willing to dispose of. In other words, you won’t want to tear multiple pages out of your favorite novel to make this work! You can choose to use newer, white pages that are straight and crisp for a more modern look. Or, you can choose to use more antiquated books with crinkled pages and more vintage looking font. More than anything, I knew that I did not want to spend a small fortune on a book to only rip out the pages. With that said, I advise checking out a second-hand store or purchasing a cheap book from Amazon. (Click “Cheap Book” for a direct link to a book for under $3.00 and skip having to leave your home!) Cheap Book
Now that you have your book pages (the bulk of the project), let’s move on to project itself! Don’t worry, the idea sounds far more intimidating than you may think. Here is how you create this look for yourself!
WHAT YOU WILL NEED:
- cardstock paper (to adhere the book pages too)
- glue-stick
- scissors
- printer
- computer (to design your image)
- a design program (Microsoft Publisher is what I used, otherwise check out free programs like Canva or PicMonkey)
- a book with pages heavy on text (no images)
DIRECTIONS:
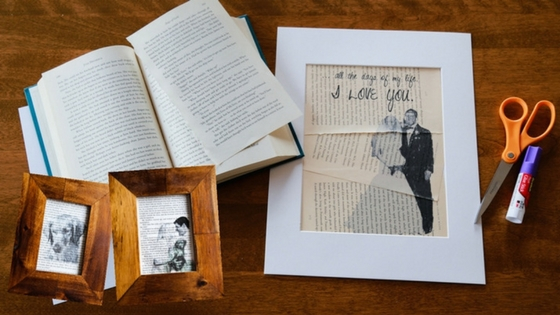
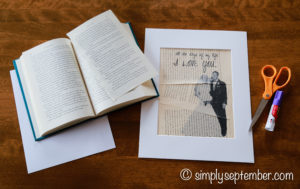
1.) Begin by deciding what size you want your book inspired picture(s) to be? I stuck to standard frame sizes and ended up making one-8×10 and two-5×7 prints.
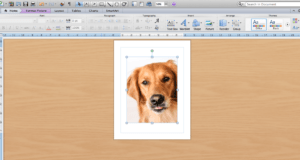
2.) Open up your design program. I love designing on Microsoft Publisher (so much so that when I switched from a PC to a Mac, I was sure to buy the Microsoft Office package for a Mac) because it is so quick and easy. (Note: for this tutorial I will be using Microsoft Publisher to design. If you do not wish for a tutorial on this, skip to step #8. If you are looking to purchase Publisher for use, you can click on this direct link. However, please note, it appears that as of the past year, Publisher is no longer offered for Mac, only PC. Microsoft Office 365 Personal | 1-year subscription, 1 user, PC/Mac Key Card)
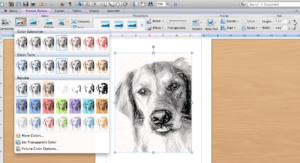
3.) After opening a new Publisher document, simply insert your photo of choice. I choose to use a photo of my dog (isn’t she the cutest?!). After inserting your picture it should look something like this:
4.) Now click on your picture so that “format picture” appears and select the third option from the left called, “filters”. I chose the one that appeared most like a sketch.
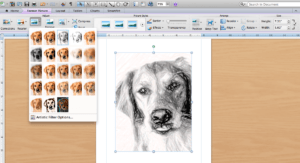
5.) Next, select the second option from the left called, “recolor” and play around with how light or dark you want the image. Additionally, if you are looking to give the sketch some color, here is your chance!
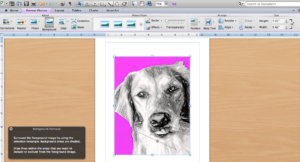
6.) Lastly, you will want to remove the background from the image. Once again click on the picture and this time select the fourth option from the left called, “remove background”. The area in the purple will be what is deleted from your image. Drag the crop box to adjust accordingly.
7.) Your design is ready to be printed! That wasn’t too hard, right?! If you wish to add any text, you can do this now with a text box prior to printing!
8.) Take a piece of cardstock to begin the project. Use the provided standard size of cardstock regardless of the size project you will be creating as this is easiest to print and then size afterwords.
9.) Now you will tear out your book pages and secure them to the cardstock. If creating a 4×6 or 5×7 project, a larger book may result in only needing one vertical page secured to the middle of a standard cardstock page (assuming your image is set to print in the middle of the document). However, if creating a 8×10 project, use multiple pages and lay them angled either vertically or horizontally in order to completely cover the cardstock.
10.) You will now secure the pages to your cardstock. I recommend allowing the pages to come slightly over the edges of your cardstock and later cut off the edges (if creating a 8×10 image). This provides for the most seamless look. Arrange your pages on the cardstock as desired and begin to secure them by using a glue-stick.
11.) Cut off the excess pages that are hanging off of your cardstock (if you completely covered the cardstock).
12.) Load your piece of cardstock into the printer and print your image! (Note: some printers flip the sheet of paper when printing so it is advised to do a test run when printing to determine if you will need to insert your page cardstock piece either right-side up or upside down.
13.) After your page has printed, simply draw a box the desired size of your project around the image and cut the page accordingly. (Tip: I find this is done the most effectively and quickly by taking out the glass from your frame and laying it over your project. Once you see exactly what you want inside the glass, you can simply trace around the glass and cut.)
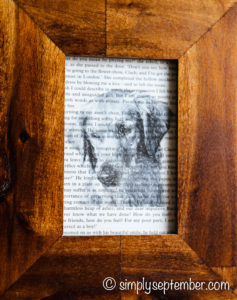
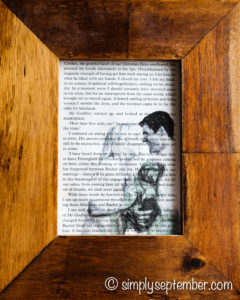
14.) Now insert your book inspired art into your frame and enjoy!!

What else have you designed with book pages?! I’d love to know! Leave a comment below!


I love how these printed projects turn out and I’m a bit obsessed with book pages, so this is a win win for me. Thanks for the clear DIY and photos.
I’m so glad you like them Ann!! I hope your project turns out wonderfully!
What a neat idea! I love them.
Thanks Joanne!
Love the idea. Thanks for sharing your tutorial at the Inspiration Spotlight party. Shared.
Thanks for the awesome tutorial on printing on book pages. I WANT TO DO THIS! Very inspiring. So I pinned and also featured your post this week. Best wishes, Linda @Crafts a la mode
http://www.craftsalamode.com/2017/01/what-to-do-weekends-party-209.html
Thank you so much Linda! So grateful 🙂
These are great, I have a few books I bought especially in a Charity shop ready to print on, I just need to get round to doing it!
By the way, If you don’t have publisher or can’t get it for your mac you can use picmonkey, even the free version has an option where you can change your photos into sketches.
How perfect! This looks like the perfect project for you then :). Thanks for pointing this out! I love picmonkey and don’t use it nearly enough! I didn’t know they turned photos to sketches 🙂
I love these so creative and they look great 🙂
Thank you!
Wow, very fun idea! Great gift for someone. Visiting from Tip Me Tuesday party.
This is such a cool project. I am a total bibliophile, so this is right up my alley. Thanks for the tutorial. I’ve pinned it and plan to use it to make something for my husband for our anniversary.
Thank you, Lisa! I love the idea of using it for an anniversary gift! I’d love to know how it goes and see your final product!
Really helpful tutorial! Love the end result. Your prints are beautiful
Aw, thank you so much, Trish!
That is an amazing idea! They look great, might have to give it a go. #ThatFridayLinky
Thank you! Please let me know if you try and enjoy it!
What a lovely idea! These look fantastic 🙂 #ThatFridayLinky
Thank you so much!
Loving this great tutorial
Thank you, Nigel!
This is a great idea! I will have to try this soon! I’m visiting from the linky party.
Thank you so much! I hope you like it :)!
I love using book pages in projects and this is a great tutorial on how to incoporate photos. Featuring when my link party opens up tonight. Thanks so much for sharing.
Thank you so much, Carol! 🙂
I like n
Be decorating with books, now I have a brand new way to do it! Thanks for sharing Lindsey
My pleasure, Brenda 🙂